
Central Vacuum System Installation Guide: What Every Canadian Homeowner Needs to Know Before Calling a Pro
Installing a central vacuum system is one of the highest-ROI home upgrades a Canadian homeowner can make—but only when the planning, parts, and installation sequence are done right. Unlike portable vacuums, a properly installed central vac routes suction through in-wall PVC tubing to a power unit mounted in your garage, utility room, or basement. The result: stronger suction, no recirculated allergens, and a system that can last 20–30 years with minimal maintenance.
This guide covers everything from rough-in planning and pipe layout to inlet valve placement, power unit sizing, and the most common installation mistakes Canadian contractors see every season.
Parts source for Canadians: vacuumpartscanada.ca stocks OEM and aftermarket central vacuum parts for most major brands—shipped across Canada.
What Is a Central Vacuum System and How Does It Work?
A central vacuum system (also called a built-in or ducted vacuum) consists of a wall-mounted power unit connected to a network of PVC tubing running through the walls, floors, and ceilings of a home. Inlet valves are installed in walls at strategic locations; homeowners plug in a lightweight hose and use it room by room. Debris travels through the tubing to the power unit's collection canister, which sits outside the living space—meaning exhaust air (and allergens) is vented outside or into an unoccupied area like a garage.
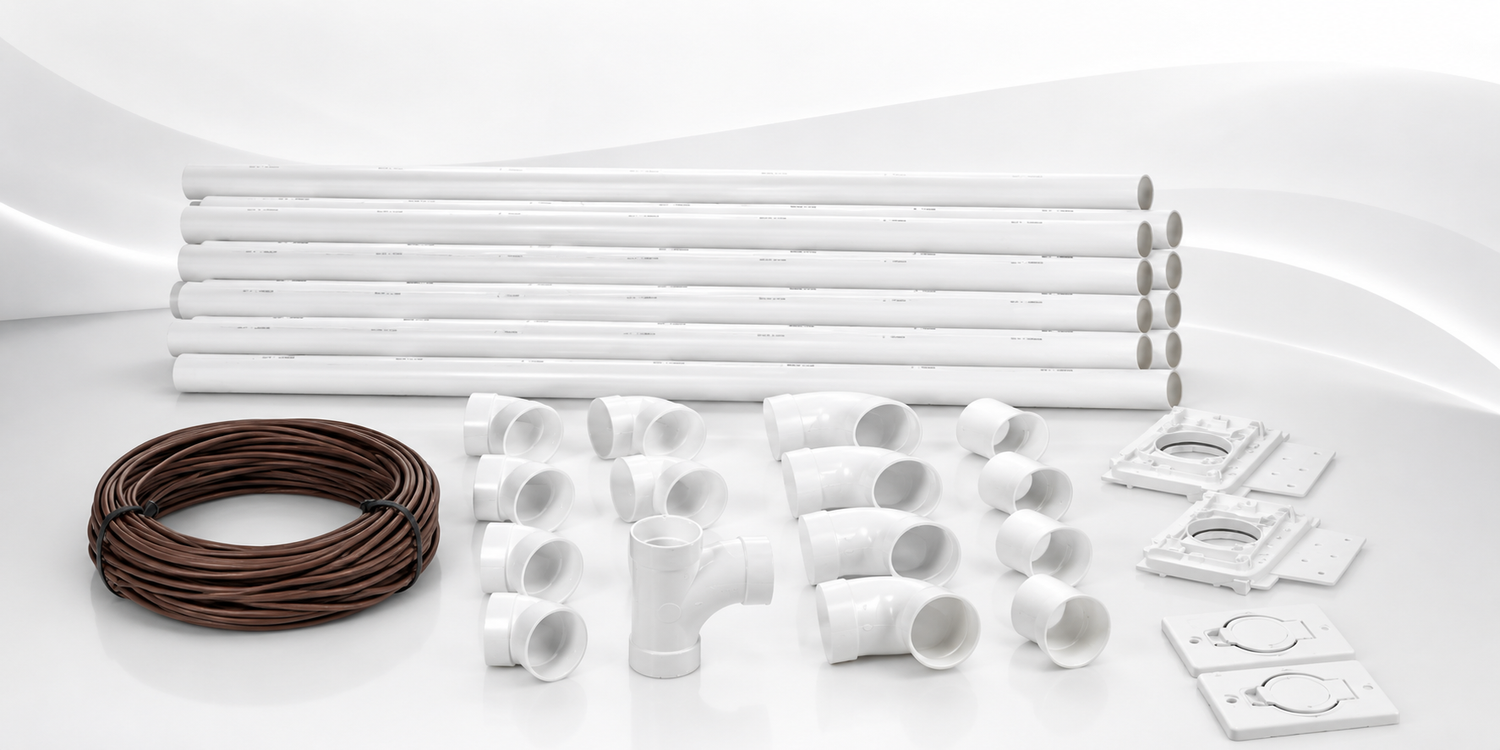
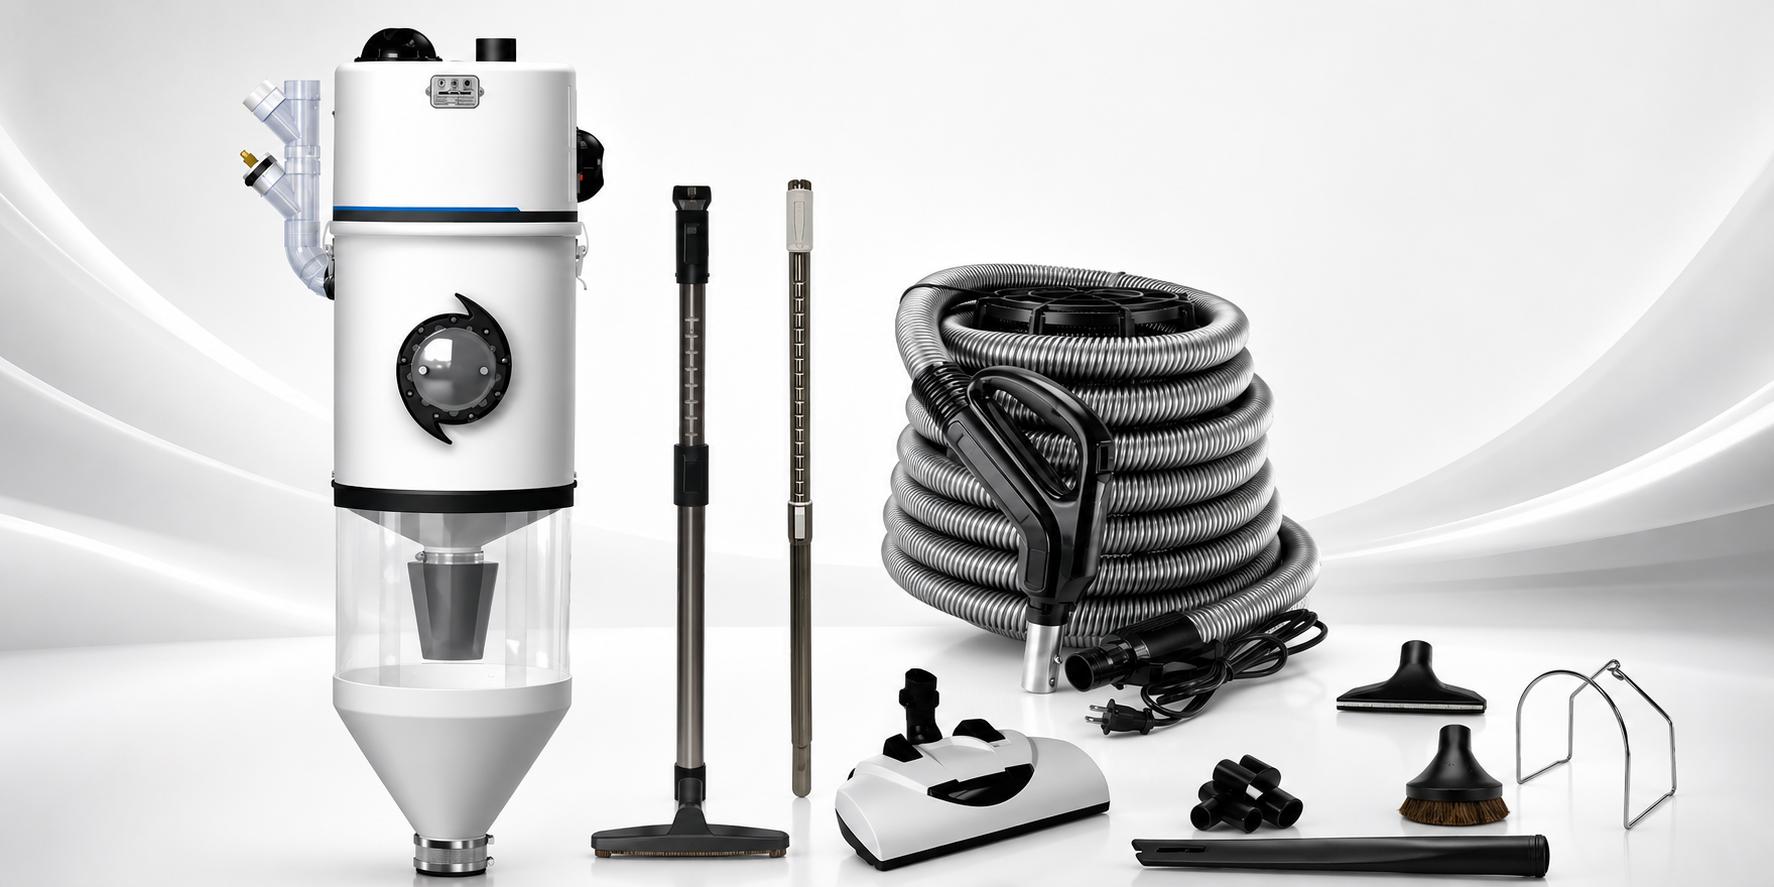
Core components of every central vacuum system:
- Power unit (motor + filtration canister)
- PVC tubing (typically 2-inch diameter, Schedule 20 or Schedule 30)
- Inlet valves (wall-mounted connection points)
- Low-voltage wiring (to activate the motor when the hose is plugged in)
- Vacuum hose and attachments (30-foot standard; electric or standard depending on model)
Planning Your Central Vacuum Installation: The Foundation of a Good Job
Sizing the Power Unit for Your Home
Power units are rated in Air Watts (AW) and Water Lift (inches). Bigger homes require higher-capacity units. Using an undersized unit is the single most common installation error in Canadian retrofits.
General sizing guide by home square footage:
| Home Size | Recommended Air Watts | Example Unit Class |
|---|---|---|
| Under 2,000 sq ft | 400–550 AW | Standard residential |
| 2,000–4,000 sq ft | 550–700 AW | Mid-range residential |
| 4,000–6,000 sq ft | 700–900 AW | High-capacity residential |
| 6,000+ sq ft | 900+ AW | Commercial-grade |
Key rule: Always size up if you have more than 5 inlet valves, multiple floors, or runs exceeding 50 feet.
Mapping the Inlet Valve Layout
Each inlet valve should cover a radius of approximately 30 feet (the standard hose length). The goal is full home coverage with minimal valve count.
Steps to map your layout:
- Draw your floor plan to scale (or use a rough sketch with measurements).
- Mark every room entry point, hallway intersection, and staircase landing.
- Place a compass point (representing 30 feet) at each proposed inlet location.
- Adjust placement so every square foot of usable floor space falls within reach of at least one inlet.
- Typical homes 2,000–3,000 sq ft need 3–5 inlet valves per floor.
Recommended inlet placement locations:
- Hallway walls near room clusters
- Kitchen (adjacent to dining area for dual-zone coverage)
- Master bedroom (separate from main hallway valve)
- Garage (for car interior cleaning—requires a different hose kit)
- Basement utility area
Planning the Tubing Route
PVC tubing runs inside walls, under floors, and through mechanical spaces. The route must minimize 90° elbows, which reduce suction.
Routing principles:
- Use 45° sweep elbows instead of 90° sharp elbows wherever possible.
- Maximum recommended run length: 50 feet of straight pipe between the inlet valve and the power unit.
- Each 90° elbow is roughly equivalent to 10 additional feet of pipe resistance.
- Route tubing through interior walls, not exterior (condensation risk in Canadian climates).
- Terminate at the power unit with a central manifold or straight runs using wyes.
Central Vacuum Installation: Step-by-Step
Step 1: Mount the Power Unit
The power unit should be mounted in a conditioned or semi-conditioned space—a heated garage, utility room, or basement mechanical room. In Canada's climate, an unheated garage is acceptable if temperatures stay above -10°C; extreme cold affects motor performance and canister seals.
Mounting requirements:
- Mount on a solid wall stud or concrete block (unit vibrates during operation).
- Minimum 6 inches of clearance on all sides for airflow.
- Height: The bottom of the unit should be a minimum of 18 inches off the floor for easy canister removal.
- Install near an exterior wall if possible—the exhaust vent needs to exit the building.
- Exhaust must vent outside or to a garage (never into living space). Use a backdraft damper on the exhaust port.
Step 2: Install the PVC Tubing Network
Use 2-inch diameter Schedule 20 PVC for residential installations. Schedule 30 is heavier and more impact-resistant, preferred for exposed runs in garages or utility rooms.
Installation sequence:
- Start at the power unit and work outward toward the inlet valves (this makes gluing and fitting connections easier).
- Drill 2.5-inch holes through wall plates, floor joists, and blocking as needed.
- Dry-fit all runs before gluing—PVC cement sets fast, and mistakes are costly.
- Use low-VOC PVC cement and primer on all joints. Twist each fitting 90° during assembly for full adhesion.
- Secure tubing with pipe straps every 4–6 feet along horizontal runs.
- Slope horizontal runs slightly toward the power unit (1/4 inch per foot) so debris doesn't settle.
- Install clean-out tees at low points and direction changes for future blockage access.
Common tubing mistakes:
- Using 1.5-inch pipe (too restrictive—always use 2-inch for residential)
- Sharp 90° elbows at direction changes (use sweeping 45° pairs instead)
- Unglued fittings (suction leaks collapse system performance)
- Forgetting to run low-voltage wire alongside the tubing before walls are closed
Step 3: Run Low-Voltage Wiring
Every inlet valve requires a 24-gauge, 2-conductor low-voltage wire running parallel to the PVC tubing. When a hose is plugged into an inlet, it completes the low-voltage circuit and signals the power unit to start.
Wiring tips:
- Fish the wire through the wall alongside the PVC tubing before closing walls.
- Leave 12 inches of excess wire at each inlet valve location for connection.
- Bundle and label wires at the power unit end for easy connection to the control board.
- Use wire staples (not sharp-edged metal staples) to secure the wire every 24 inches inside walls.
Step 4: Install Inlet Valves
Inlet valves mount in standard single-gang electrical boxes or dedicated central vac rough-in boxes. Most brands use a standard 2-inch slip-fitting connection to the PVC tubing.
Inlet valve installation steps:
- Cut the drywall opening for the rough-in box at your pre-planned location.
- Connect the PVC tubing to the back of the rough-in box using the slip fitting.
- Fish the low-voltage wire through the box opening.
- Secure the rough-in box to the wall stud.
- After drywall is finished, install the inlet valve plate and connect the low-voltage terminals (polarity does not matter on most brands).
- Snap the decorative cover plate over the valve.
Valve height standard: Install at the same height as electrical outlets—12 to 18 inches from the finished floor. This keeps them accessible and visually consistent.
Step 5: Connect Tubing to the Power Unit
At the power unit, all PVC runs terminate at an inlet port on the canister or a central manifold. Most residential units have one or two inlet ports.
Connection steps:
- Connect the main tubing run(s) to the power unit inlet port(s) using a rubber coupler or PVC fitting (check manufacturer spec).
- Do not glue this connection permanently—use a rubber sleeve coupler so the unit can be serviced or replaced.
- Connect all low-voltage wires to the power unit's terminal block (refer to the specific model's wiring diagram).
- Install the exhaust duct from the power unit's exhaust port to the exterior wall penetration.
- Install a backdraft damper on the exterior exhaust port.
Step 6: Test the System
Before closing walls or finishing, perform a full system test.
Testing checklist:
- Plug a hose into each inlet valve—the motor should start within 1–2 seconds.
- Check suction at each valve using a tissue or lightweight debris.
- Listen for air leaks at PVC joints (a hissing sound indicates an unglued or poorly fitted connection).
- Verify the exhaust is exiting through the exterior vent, not back into the space.
- Run the system for 5 full minutes continuously and check for motor overheating.
Retrofitting a Central Vacuum System in an Existing Canadian Home
Retrofit installation is more complex than new-build rough-in because walls are already finished. The approach depends on your home's construction type.
Retrofit Strategies by Home Type
Wood-frame homes (most common in Canada):
- Route tubing inside walls using a fish tape and strategic drywall cuts at top and bottom plates.
- Use flexible central vacuum tubing for short runs through tight cavities—it's harder to clog than corrugated flex pipe.
- Existing interior walls with insulation are the biggest obstacle; plan routes along uninsulated interior partition walls.
Homes with accessible basements or crawlspaces:
- Route all horizontal tubing runs through the basement ceiling, then drop vertically into walls.
- This dramatically reduces drywall repair and is the preferred approach for most Canadian homes with full basements.
Condos and apartments (less common):
- Check strata/condo bylaws first—many buildings prohibit in-wall penetrations between units.
- Some multi-unit buildings permit single-floor installations using closet routing.
Minimizing Drywall Damage in Retrofits
- Use a stud finder and endoscope camera to map wall cavity obstructions before cutting.
- Cut access holes at top and bottom plates, not mid-wall, for easier patching.
- Install inlet valves on the same wall cavity where the tubing runs—avoid drilling through multiple stud bays.
- Plan tubing routes through closets, pantries, and utility spaces where patchwork is hidden.
Central Vacuum Installation Costs in Canada (2025)
Costs vary by province, home size, and whether it's a new build or retrofit.
Typical Price Ranges
| Scope | DIY (Parts Only) | Professional Installation |
|---|---|---|
| New build rough-in (2,000–3,000 sq ft) | $400–$700 | $1,200–$2,000 |
| Retrofit (2,000–3,000 sq ft) | $600–$1,000 | $1,800–$3,000 |
| Power unit replacement only | $250–$700 | $350–$900 |
| Single inlet valve addition | $50–$100 | $150–$300 |
Factors that increase cost:
- Homes with no basement (slab-on-grade)—all tubing must go through walls
- Homes with spray foam insulation in walls
- Multi-storey homes requiring longer tubing runs
- Premium power units with HEPA filtration or self-cleaning filters
- Remote-start or smart-home integration features
Where to save money in Canada:
- Source parts directly from vacuumpartscanada.ca rather than buying through an installer (markup on parts is typically 40–80%).
- Do your own rough-in (run pipe and wire yourself) and hire labor only for the electrical hookup and final commissioning.
- Buy an open-box or manufacturer-refurbished power unit—most central vac motors last 15–20 years with basic maintenance.
Choosing the Right Central Vacuum System for Canadian Homes
Filtration Types
Filtered (bagged) systems:
- Debris is collected in a disposable paper or cloth bag inside the canister.
- Most hygienic option—bag traps fine dust during emptying.
- Best for: allergy sufferers, homes with pets, anyone concerned about fine particulate exposure.
- Maintenance: replace the bag every 3–6 months depending on use.
Cyclonic (bagless) filtration:
- Uses centrifugal force to separate debris; the canister is emptied directly.
- No ongoing bag cost, but more dust exposure during emptying.
- Best for: high-volume use, homes without allergy concerns.
- Maintenance: empty canister every 1–3 months; clean filter annually.
Water filtration systems:
- Debris is trapped in water—cleanest exhaust air of any type.
- Higher upfront cost; the canister must be emptied after each use.
- Less common in Canadian residential installs but available for premium applications.
Canadian Climate Considerations
- Garage-mounted units: Ensure the power unit is rated for low ambient temperature operation if your garage drops below -15°C. Most standard units are rated to -10°C; cold-weather models exist for unheated spaces.
- Exhaust venting: The backdraft damper on the exterior vent is non-negotiable in Canadian climates—without it, cold air drafts back through the tubing and causes condensation and motor corrosion.
- Humidity: In humid Maritime or BC coastal environments, use PVC pipe strapping with a slight continuous slope toward the power unit to prevent moisture pooling.
Maintenance and Troubleshooting
Routine Maintenance Schedule
| Task | Frequency |
|---|---|
| Empty canister / replace bag | Every 3–6 months |
| Clean or replace motor filter | Annually |
| Inspect and clean inlet valve gaskets | Annually |
| Check exhaust vent exterior cap for blockage | Every spring |
| Test suction at all inlets | Annually |
Common Problems and Fixes
Weak suction at one valve but strong at others:
- Cause: partial blockage in the tubing branch serving that valve, or a cracked PVC joint in that run.
- Fix: use a blockage clearing kit (available at vacuumpartscanada.ca) to push or pull the obstruction clear. Inspect the PVC run for cracked joints.
The motor runs, but there is no suction anywhere in the system:
- Cause: full canister/bag, clogged motor filter, or a major tubing disconnection near the power unit.
- Fix: empty the canister and replace the filter first. If suction doesn't return, inspect the main inlet connection at the power unit.
Motor won't start when hose is plugged in:
- Cause: failed low-voltage wire connection at the inlet valve or power unit, or a faulty relay on the control board.
- Fix: test the low-voltage circuit at the inlet valve with a multimeter. If voltage is present at the valve but the unit doesn't start, the control board relay is the likely failure.
Hose doesn't stay latched in the inlet valve:
- Cause: worn inlet valve gasket or damaged latch mechanism.
- Fix: replace the inlet valve cover plate assembly—this is a direct swap requiring no tools on most brands. Parts available from vacuumpartscanada.ca.
DIY vs. Hiring a Professional Installer in Canada
When DIY Makes Sense
- New construction or major renovation where walls are open
- Homeowners comfortable with basic plumbing rough-in (similar skill set)
- Homes with accessible basements for easy horizontal runs
- Replacing or upgrading an existing power unit (straightforward swap)
When to Hire a Professional
- Fully finished home with no basement access
- Multi-storey custom homes with complex layouts
- Homes requiring electrical permit (most provinces require a licensed electrician to connect the power unit to a dedicated 120V circuit)
- Any installation where you'd need to run tubing through exterior walls or structural members
Permits in Canada: Central vacuum installation generally does not require a building permit, but the electrical connection (dedicated 120V/20A circuit) does in most provinces. Always confirm with your local municipality. In Ontario, Alberta, and BC, an ESA or AHJ inspection is standard for new dedicated circuits.
Finding Parts and Supplies in Canada
One of the most common frustrations Canadian homeowners face is sourcing replacement parts—especially for older or discontinued brands like Electrolux, Beam, Hayden, MD Manufacturing, or Vacuflo.
What to look for in a Canadian parts supplier:
- OEM and aftermarket compatibility listed clearly by brand and model
- Stock of both current and legacy components (hose swivels, inlet valve covers, motor brush sets, canisters)
- Ships nationwide—not just to major centres
- Clear return/exchange policy for parts ordered by model number
vacuumpartscanada.ca sources parts for most major brands available in Canada and ships nationwide.
Key Takeaways
- Size your power unit by Air Watts, not brand marketing—match to your home's square footage and valve count.
- Use 2-inch PVC throughout. Use 45° sweep elbows. Slope runs toward the power unit.
- Run low-voltage wire alongside every PVC run before closing walls.
- In Canada, always install a backdraft damper on the exterior exhaust vent.
- For retrofits, plan your route through basements and closets to minimize drywall cuts.
- The electrical connection requires a licensed electrician and inspection in most Canadian provinces.
- For parts, replacements, and compatible accessories, vacuumpartscanada.ca covers most brands shipping across Canada.
Published by the team at Vacuum Parts Canada—your Canadian source for central vacuum system parts, filters, hoses, and accessories.
Leave a comment
This site is protected by hCaptcha and the hCaptcha Privacy Policy and Terms of Service apply.